
A stubborn zipper can turn your favorite jacket or jeans into a frustration. Many people believe only a tailor can fix zippers, but you can solve common zipper issues at home and save your garments.
Zippers fail for many reasons: misalignment, stuck sliders, or snagged fabric. Learning to fix zippers immediately extends the life of your clothes and reduces waste. It also saves money by deferring costly repairs or replacements.
This guide provides smart, actionable steps for fixing zippers using tools you already have. Read on to discover practical strategies, simple checklists, and real-world examples that’ll help your clothing last longer.
Diagnosing Common Zipper Problems and Deciding Your First Move
The right first step depends on identifying if your issue is with the teeth, slider, or fabric. Recognizing the actual cause helps you fix zippers quickly and avoid extra damage.
For example, a crooked slider feels wobbly or the teeth don’t mesh. Testing the zipper slowly by hand typically reveals if it’s a slider issue or if something’s caught inside.
Visual Inspection: Spot Issues in Seconds
Check that the zipper’s teeth line up from top to bottom by gently pulling apart small sections. If they don’t align, a bent or clogged tooth may be to blame.
Hold the fabric taut and slide the zipper slowly. If it snags or skips, examine the slider or look for threads caught in the teeth. A flashlight makes tiny snags visible.
Rub the slider between your fingers. If it feels loose or tilts, it may need adjustment. Run your nail along the teeth to locate roughness indicating hidden debris or minor bends.
Determining Repair vs. Replacement
If both sides of the zipper separate after closing, the slider is usually at fault. Minor bends or missing teeth near the end suggest repair is viable. A missing bottom stop may also be fixable.
If several teeth are gone or the fabric is torn at the seam, replacement may be smarter. For cosmetic fixes—such as a stuck zipper—simple cleaning is usually enough.
If one end detaches completely from the garment, more advanced sewing may be required. If this sounds daunting, start with the simplest repairs explained below.
| Issue | Likely Cause | DIY Fix? | Action Step |
|---|---|---|---|
| Teeth misaligned | Bent tooth or debris | Yes | Straighten gently with pliers, clean debris |
| Slider separated | Worn slider | Yes | Tighten with pliers or replace slider |
| Fabric snag | Thread caught | Yes | Remove thread with tweezers |
| Zipper stuck | Grit or buildup | Yes | Apply lubrication, clean out grit |
| Missing stop | End cap off | Yes | Replace with new stop or sturdy thread |
Lubricating Stuck Zippers: Simple Steps for Restoring Smoothness
Lubrication removes grit that traps the slider. Use common household items to restore zip action on jackets, bags, or tents in minutes.
Choose a dry lubricant or wax; greasy products can stain fabric. A single pass of a suitable lubricant usually lets the teeth mesh and glide again.
Checklist: Prepare and Apply Lubricant
Slide the zipper up and down to expose the full length. Tap excess dirt free by gently brushing the teeth with an old toothbrush first.
- Apply bar soap directly to both sides—move the slider to distribute.
- Rub a white candle lightly along the teeth—works for plastic or metal zippers.
- Draw a graphite pencil tip over the teeth—the carbon reduces friction fast.
- Wipe off any residue with a soft cloth to prevent transfer to clothing.
- Work the zipper back and forth to ensure full coverage; repeat if needed.
The right technique protects fabric and prevents buildup. Don’t use oily lubricants, as they can attract dirt, causing new snags over time.
Mini-Scenario: Quick Fix on the Go
Maria grabs her jacket in the morning but finds the zipper won’t budge. She rubs a plain candle across the teeth, then moves the slider back and forth. It works.
- Rub dry bar soap for clean lubrication, avoiding mess and stains on delicate materials.
- Stick with clear, unscented candles—colored wax could transfer to light fabrics and show marks after use.
- Carry a graphite pencil in your bag for quick, no-sheen, and mess-free zipper fixes anywhere.
- Never use WD-40 or greases since they draw dust or oil stains, impacting clothes and hands alike.
- Brush grit out before applying; debris can scratch the slider or make the problem worse if not cleared first.
Lubricating early prevents slider wear and keeps jackets and pants lasting longer. One minute of care often saves the garment from the donate pile.
Checklist: Lubrication Dos and Don’ts
Check teeth for visible debris before any lubricant. If using soap, rub it on a paper towel, then onto the zipper, to control the amount on delicate fabric.
- Test on an inconspicuous spot to ensure your lubricant won’t discolor the material.
- Apply in thin layers—using too much can gunk up folds, attracting lint or crumbs you want to avoid.
- Restart lubrication every few months for heavy-use zippers on backpacks or boots to keep things running smooth.
- Choose dry, natural ingredients over sprays for anything worn next to skin, especially for kids’ clothes or pillow covers.
- Spot-wash zipper areas after repair to fully remove any leftover lubricants and avoid fabric stains during wear.
If gentle lubrication doesn’t restore operation, try fixing alignment or the slider itself with the steps below.
Realigning Zipper Teeth for a Secure Closure Every Time
A zipper that separates after closure usually signals misaligned teeth. Realigning avoids full replacement and helps fix zippers before issues worsen.
Repair works best when snags appear near the middle. For more severe separation near the ends, reinforce with a new top or bottom stop first.
Targeted Steps for Minor Tooth Bends
Bent teeth cause gaps or clicking as the slider moves. Using needle-nose pliers, gently press teeth back into line. Avoid wiggling side to side, as this can break them off.
Check the alignment by slowly zipping and unzipping after each adjustment. If your teeth don’t lock together fully, repeat the straightening process on the affected area.
Test with firm but slow slider motion. If the slider skips, a second pass of gentle alignment fixes subtle bends that feel invisible by touch alone.
Scenario: Quick Tooth Reset for Jeans
Standing in front of a mirror, Chris notices his jeans zipper splits at the halfway point. With small pliers, he presses both sides’ teeth back together then zips gently. No gaps remain.
This hands-on approach extends his jeans’ lifespan. Chris reminds himself to check zippers before tossing clothes in the hamper next time to catch issues early.
Repeat this strategy on backpacks or outdoor gear, especially if you hear clicks or skipping while the zipper moves, since early tweaks prevent total failure.
Tightening or Replacing the Zipper Slider for Smooth Performance
A slack or uneven slider can’t keep teeth engaged. Tightening or swapping out the slider is one of the fastest, most reliable ways to fix zippers of all kinds.
Sliders naturally loosen over time—especially on frequently worn clothing, resulting in mid-zip gaps or full separation. You’ll only need pliers and a steady grip.
Basic Slider Tightening Process
Slide the zipper all the way down. Use needle-nose pliers to gently squeeze the slider’s sides—one light squeeze usually restores holding power.
Move the slider up and down, checking that teeth re-engage. Don’t over-squeeze, as this may break the mechanism. Listen for a soft click and verify both sides stay meshed.
This approach fixes most casual wear zippers. If tightening fails or the slider’s metal cracks, continue by replacing it. Have spare sliders in your sewing kit for quick swaps.
Replacing a Worn Slider: Step Sequence
Open the zipper completely and remove the top stop with pliers. Slide off the broken slider, position the new one, then squeeze the top stop back in place.
Check the new slider’s fit carefully—the wrong size leads to snags or skips. Close the zipper fully and tug on both ends to confirm a secure seat before wearing.
If unsure about size, take the old slider to a hardware store and compare—staff can help identify matches that fit your specific zipper tooth shape.
Replacing a Broken Zipper Stop for Long-Term Durability
Stops—at the zipper’s ends—prevent the slider from coming off. Replacing worn or missing stops protects from further damage and makes zippers reliable again.
New stops are sold in sewing shops, but you can use a sturdy thread or fabric scrap for emergency fixes. This quick repair often adds years to your garment’s life.
DIY Fabric Stop Solution
Loop heavy-duty thread several times around the end of exposed zipper tape. Knot tightly to form a barrier so the slider can’t slide off during wear.
If available, fold a small piece of matching fabric and stitch it in place as a makeshift stop. This blends in and absorbs pressure effectively when closing the zipper.
Both methods work for pants, purses, or jackets with missing stops, buying you time until a new metal or plastic stop can be installed with pliers.
Replacing Metal or Plastic Zipper Stops
Open the zipper all the way. Slide the stop onto the tape’s end, then clamp down firmly with pliers until it sits flush and immobile. Test movement several times.
Use a matching stop—silver, black, or clear—to ensure the repair looks natural and avoids sharp edges that snag fabric or skin. Test for smooth slider motion post-fix.
In an analogy, swapping a zipper stop is like changing a shoelace aglet: small but crucial. Always check stops before washing or lending out clothes to catch issues early.
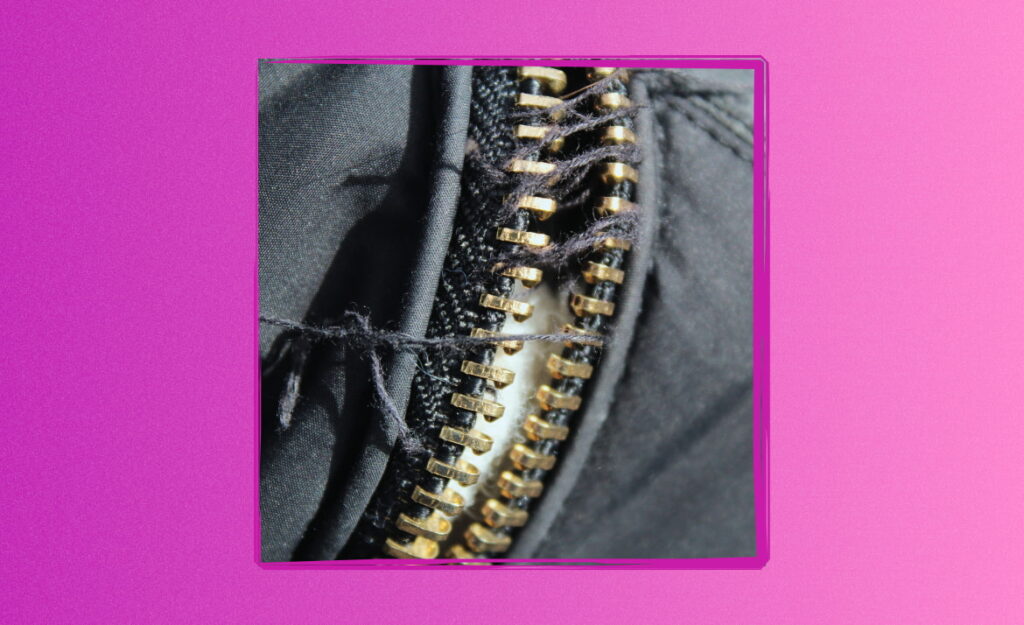
Patching Fabric Snags and Protecting the Zipper Track
Zipper jams sometimes come from threads or fabric ends caught in the teeth. Removing these carefully prevents damage to delicate garments and makes fix zippers efforts last.
If snagged threads keep returning, reinforce the surrounding fabric. You’ll need sharp scissors and a needle with strong thread for best results on wear-prone items.
Removing Snags Without Stretching the Tape
Use tweezers to slowly pull loose threads free from zipper teeth. If the thread is firmly caught, cut it off closely with manicure scissors. Don’t tug, as this can distort the tape.
Once the area is clear, slide the zipper open and closed several times to ensure smooth motion. Wash the garment before use to catch lingering bits.
Repeat often for jackets or pants that ride up during movement. Inspect the track after every fix. Quick response saves time and stops serious damage spreading along the seam.
Reinforcing the Track Against Future Snags
Thread a needle with doubled-up polyester thread then stitch small whipstitches along the tape at the region where snags tended to form. This prevents new pulls or splits.
Keep stitches small and neat—avoid loose loops that catch. For visible repairs, choose thread that blends with the tape color, particularly with exposed front zippers on jackets.
If you commonly catch the same spot repeatedly, sew on a fabric patch or iron-on interfacing behind the tape. This shields it from wear without visible bulk.
Conclusion: Gaining Zipper-Fix Confidence for Lifelong Value
Mastering several ways to fix zippers lets you extend clothing life and avoid hasty replacements. With a small toolkit and know-how, most zipper issues resolve in just minutes.
Each targeted technique—from spot lubrication to full slider replacement—delivers reliable results on everything from kid’s jackets to high-end bags. Skills develop quickly, boosting your garment confidence whenever zippers get fussy.
Apply these steps as soon as an issue appears. A proactive zipper fix becomes routine, so garments stay comfortable and sustainable with minimal effort and cost.
Frequently Asked Questions
What if my zipper is stuck halfway up?
Try dry lubricants such as soap, candle wax, or a graphite pencil first. If this won’t budge the slider, check for fabric or threads caught within the teeth and remove them gently. Persistent stuck zippers often respond to repeated lubrication and cleaning.
Can I fix a zipper if some teeth are missing?
If only one or two teeth are missing near the end, you can sometimes reposition the stop to limit the slider’s range and still use the item. If multiple or central teeth are missing, full zipper replacement is usually required for reliable closing.
How do I replace a zipper slider without special tools?
You only need small pliers to squeeze or slide off the old slider. Use them to gently press new sliders onto the teeth. Always test the fit by working the slider back and forth several times before wearing or washing the garment.
Is it better to repair or replace a broken zipper?
Repair is effective for issues like stuck sliders, minor bends, or missing stops. Wholesale replacement is best for deeply broken, missing, or torn teeth, or when repairs don’t restore smooth operation after several tries. Always start with the simplest repair option first.
Can I prevent future zipper breakdowns?
Yes. Keep your zippers debris-free, lubricate every few months using dry materials, and check for tooth alignment regularly. Be gentle when closing zippers, avoiding tugs at odd angles. Early attention prolongs zipper performance by catching and correcting minor issues before they worsen.